In this electronics project, we will make a Wireless power transmission circuit, using any NPN transistor. This power transmission circuit mainly works on the principle of mutual inductance. It can power a LED without any wires, at a distance of 2 inches. Let's make it!
Components List
The following components are needed for this project.- 0.25mm Insulated Copper Wire (As per required).
- Any NPN Transistor (1 pcs).
- 1 Watt, 22 Ohm Resistor (1 pcs).
- 0.01uF Non-Polar Capacitor (1 pcs).
- 22uF, 50V Capacitor (1 pcs).
- LED (1 pcs).
- PCB Board (1 pcs)
- 1.5-9V Battery (1 pcs).
- Wires (As per required).
Tools needed:
- Soldering Kits.
- Scissors/Knife.
Circuit diagram
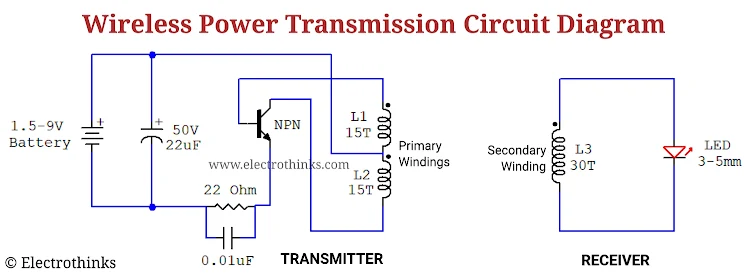
The wireless power transmission circuit is two separate circuits, namely the Transmitter circuit, and the Receiver circuit. The transmitter circuit is an oscillator circuit, which has a striking resemblance to the Joule circuit. However, the receiver circuit is normal, which is directly connected to the load.
Schematic of the wireless power transmission circuit shown below.
Circuit explanation
NPN Transistor. I used a BLD123D transistor from the CFL bulb circuit. [You could use any NPN transistor such as 2n2222, bc547, bd139, tip3055, MJE13001, MJE13005, MJE13007, etc.]
Resistor. A 22 Ohm resistor would be used to protect the transistor from burning out in case of overload or excess usage at heat. This resistor gets very hot, so you can use a resistor of 1 watt or higher.
Capacitors. 0.01uF non-polar capacitor used for noise canceling and 22uF 50V capacitor used for smoothing the input dc voltage.
Primary Windings. In the transmitter circuit, the primary windings are 15-0-15 turns with a diameter of 4 cm using 0.25mm insulated copper wire. The internal connection of primary windings is shown below.
Secondary Winding. In the receiver circuit, the secondary winding is 30 turns with a diameter of 4 cm using 0.25mm insulated copper wire.
LED. For this circuit, the LED only shows the circuit in action. I used 2mm red LED (you could use any LED).
Battery. Use 1.5-9V, ≥1.5 Amp Battery. Here I used a 3.7V Lithium cell.
See Also:Safe Simple Lithium Cell Charger.
After soldering
Demo & Testing
Below, you can see the wireless power transmission circuit in action.


Sir, can I use D882 transistor in this circuit?
ReplyDeleteYes! You can 😊.
DeleteSir want this kit with report and ppt
DeleteGood circuit
ReplyDeleteI build a clock with iluminated hands I need to have small coils - 2cm maximum will this work ??
ReplyDeleteIt'll be very low!!! But, it's a very difficult job to determine how many turns are needed to make it. Although the number of turns using thin insulated copper wire will be between 1000-1500 turns (not critical).
DeleteAm, try this project , I hope I will not waste my money on it, can you account that it will work ¿
ReplyDelete